

Images can do more than sit still on a page. With the right animation, they can guide attention, add depth, highlight important content, and make a Bricks Builder website feel far more interactive.
With BricksFly you can create image animations directly inside your Bricks workflow without relying on custom JavaScript for every effect. From smooth reveals and parallax movement to scroll-based transitions, BricksFly gives you more control over how images enter and behave on the page.
In this guide, you’ll learn how to create image animation in Bricks Builder step by step and fine-tune the effect for a polished, responsive result.
To create image animation in Bricks Builder, activate the Image Animation extension in BricksFly, then edit a page in Bricks and select an image element. Open Image Animation and choose an effect: Reveal for sliding the image in from a direction, Scale for resizing it as you scroll, or Stretch for a dynamic stretching motion. Set the direction, start point, and easing, and the image will animate without writing any code.
What is Image Animation in Bricks?
Image animation in Bricks means applying scroll-based motion to an image element so it responds as the visitor moves down the page. Instead of an image simply sitting in place, it reveals, scales, or stretches according to the effect you choose and the scroll position you set.
These effects are powered by GSAP, the animation engine behind most premium web motion. Scroll-based image animation ties the effect to the viewport: you define where in the scroll the animation should start, which direction the image moves, and how the motion eases, and the animation plays as the visitor reaches it.
In BricksFly, Image Animation is one of the GSAP extensions. Rather than writing GSAP, you enable the extension, select an image element, and configure the effect through visual controls. The tool generates the animation for you, so a designer or portfolio creator can add professional scroll motion in minutes.
Before You Start: Requirements and Activation
Image Animation is a Pro extension in BricksFly, so a quick setup comes first.
Requirements
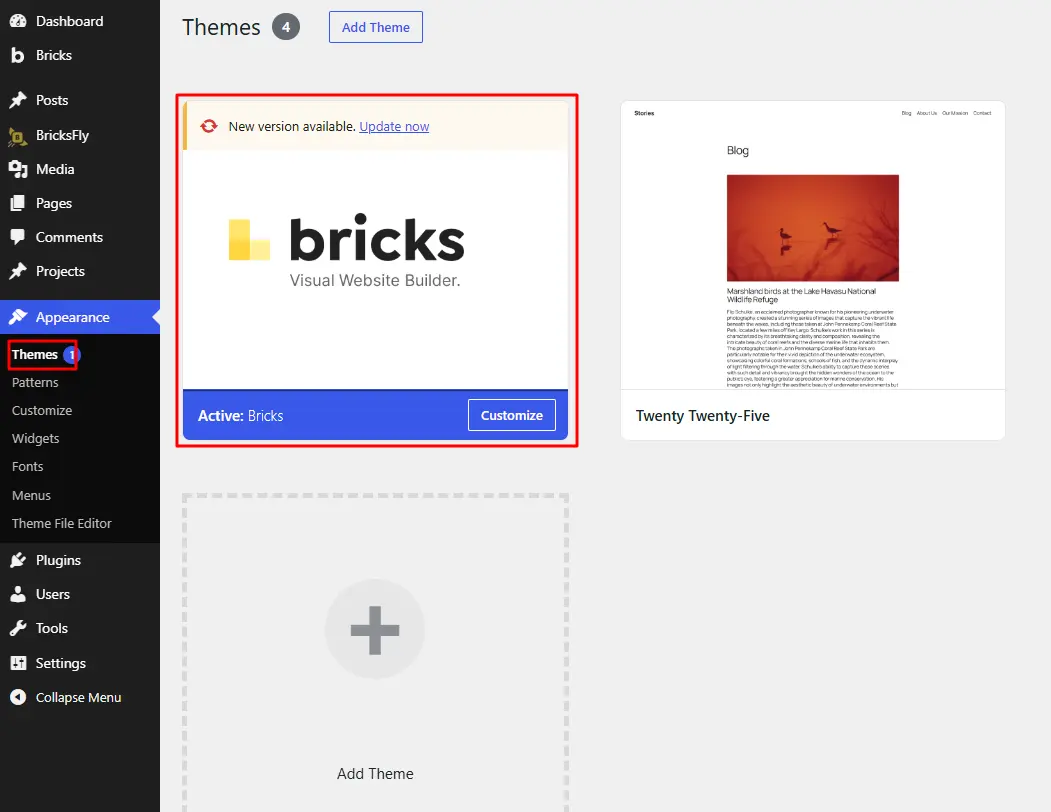
Make sure you have installed:
- The Bricks theme
- BricksFly Pro
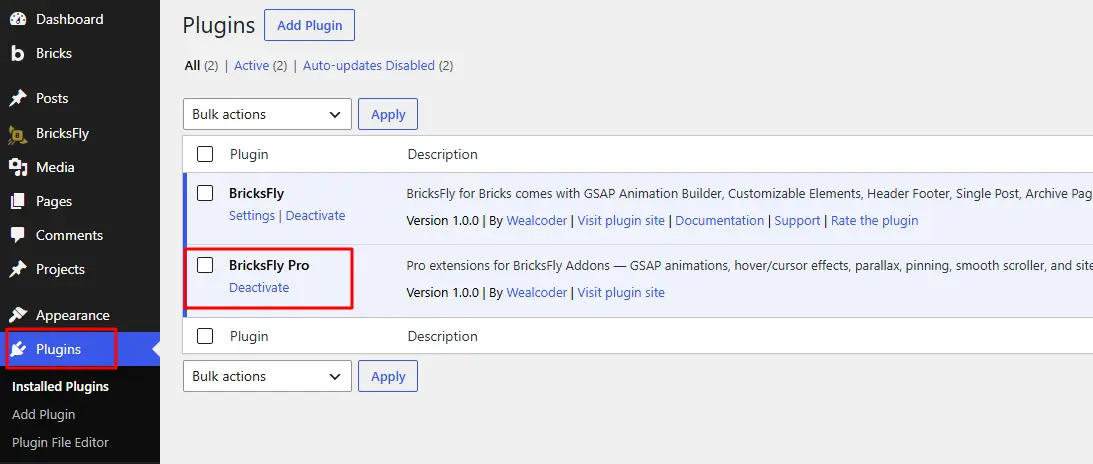
Image Animation is part of BricksFly’s Pro GSAP extensions, so the Pro plugin is required to access it.
Activating Image Animation
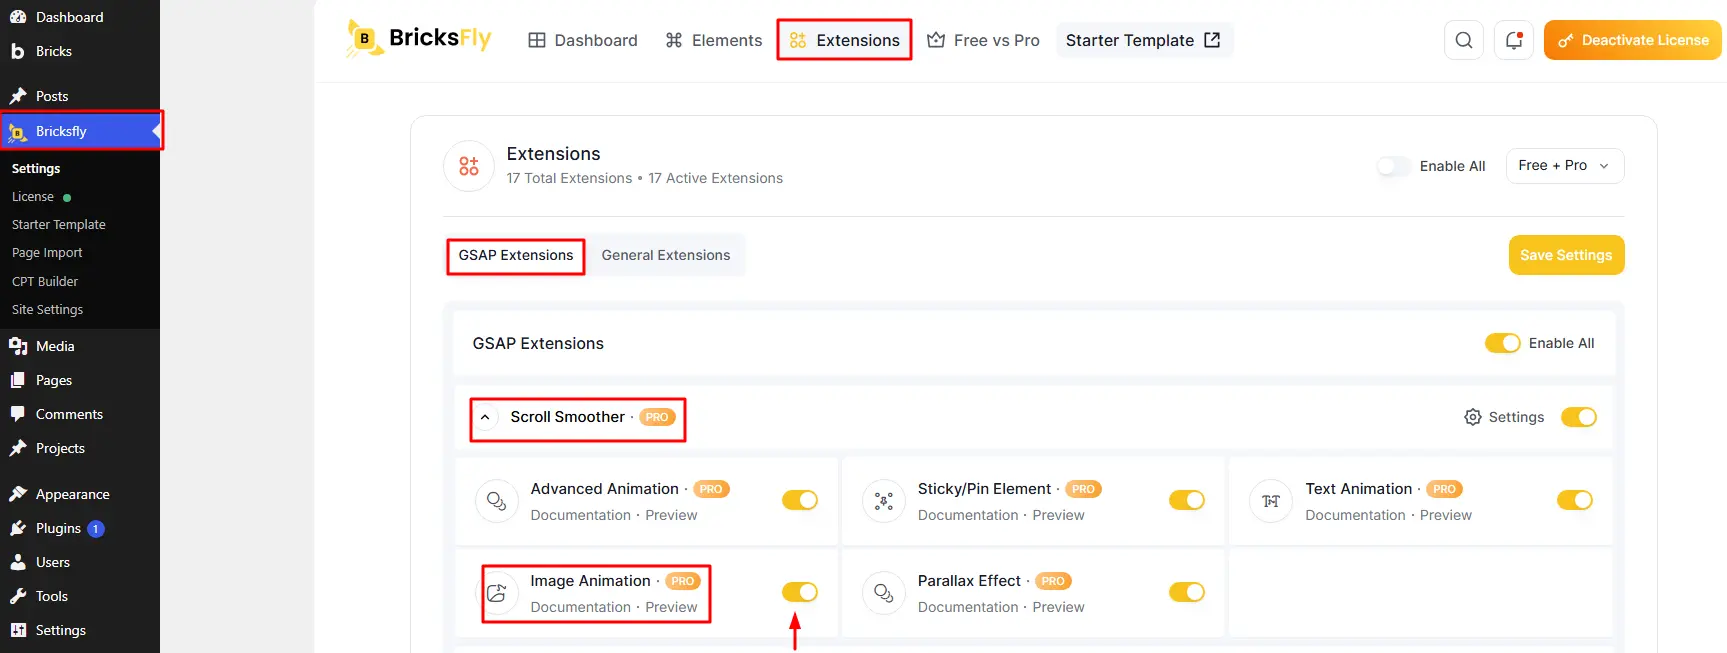
Enable the feature before using it in the editor:
- Go to your WordPress Dashboard.
- Click on BricksFly.
- Head to the Extensions tab.
- Under GSAP Extensions, then Scroll Smoother, toggle on Image Animation.
Once activated, the Image Animation controls appear in the Bricks editor when you select an image element, and you’re ready to apply motion to any image on your pages.
The Image Animation Options in BricksFly
When you select an element and open Image Animation, you’ll see four options. Each produces a different kind of motion.
| Option | What It Does | Best For |
| Reveal | Slides the image in from a chosen direction | Portfolio images, content sections |
| Scale | Adjusts image size smoothly as users scroll | Hero images, feature visuals |
| Stretch | Adds a dynamic stretching movement | Eye-catching, standout visuals |
Reveal
The most versatile effect. The image slides into view from the left, right, top, or bottom as the visitor scrolls to it. This is the workhorse choice for portfolio grids, gallery images, and supporting visuals throughout a page.
Scale
Scale smoothly adjusts the size of your image as users scroll, growing or shrinking it based on the start and end values you set. It suits hero images and features visuals where you want a subtle sense of depth and movement.
Stretch
Stretch adds a dynamic stretching movement designed to catch the eye with simple but effective motion. It works best on standout visuals where you want a more distinctive entrance.
Step by Step How to Add Image Animation in Bricks Builder using BricksFly
Follow these steps to add image animation in Bricks Builder using BricksFly without writing custom code. You’ll learn how to select an image, configure the animation settings, and fine-tune the effect for a smoother visual experience.
Step 1: Choose Reveal Animation
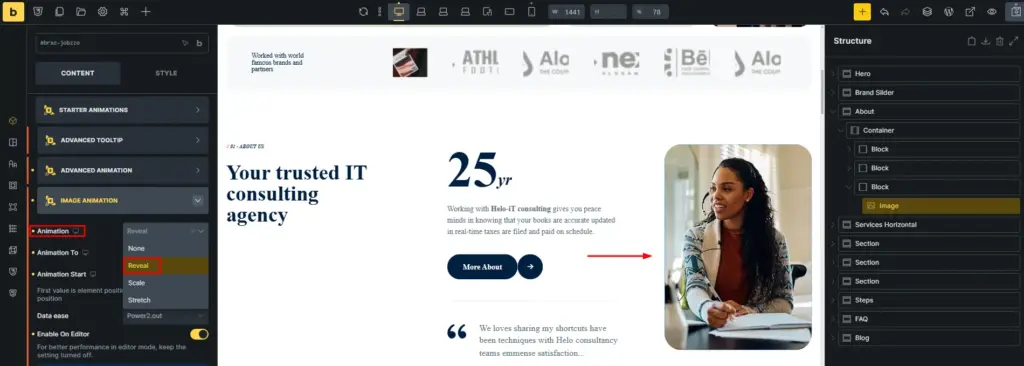
Out of the all three, we use reveal image animation which you’ll use most, so it’s worth understanding its settings in detail. Select the image element you want to animate, open Image Animation, and choose Reveal from the Animation options.
Step 2 : Choose Animation Direction
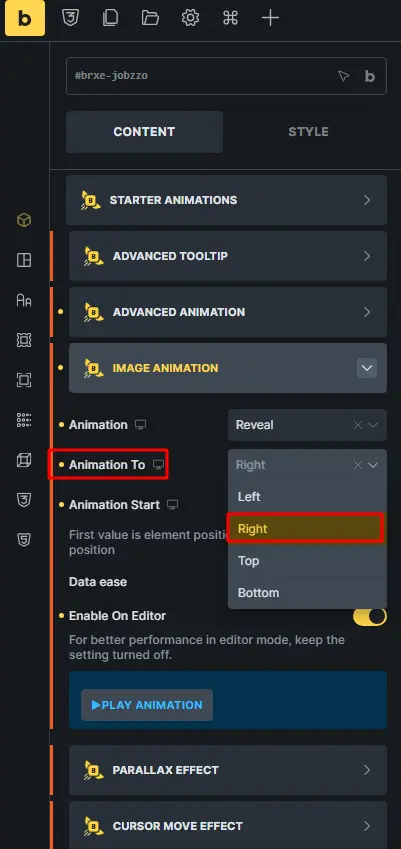
This setting controls the direction the image animates from:
- Left: slides in from the left
- Right: slides in from the right
- Top: slides in from the top
- Bottom: slides in from the bottom
Here, we use Right for our image animation, but choose the direction that fits your design. As a rule, matching the direction to your layout (an image on the right sliding in from the right) feels natural.
Step 3 : Where to Start the Animation
This defines when the animation begins, based on where the image sits relative to the screen:
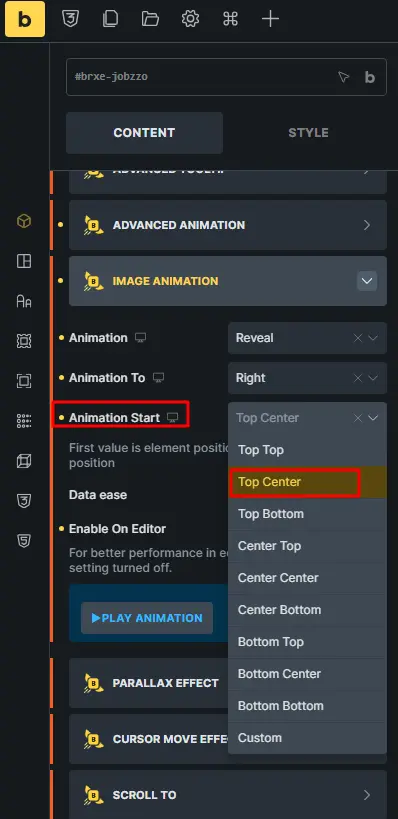
- Top Top: starts when the top of the image aligns with the top of the screen
- Top Center: starts when the top reaches the center
- Top Bottom: triggers earlier, when the top hits the bottom of the screen
- Center Top: starts when the center hits the top
- Center Center: triggers when the image center reaches the screen center
- Bottom Top: starts when the bottom of the image reaches the top of the screen
- Bottom Center: triggers when the bottom hits the screen center
- Bottom Bottom: begins when the image bottom aligns with the bottom of the screen
- Custom: lets you set custom scroll values for your design needs
We use Top Center for the image. For most reveals, a start point that fires as the image comes into view (such as Top Bottom or Top Center) feels natural, because the visitor sees the animation rather than missing it.
Step 4: Choose the Data Ease for the Image Animation
Easing controls how the motion accelerates and settles, which shapes the personality of the effect:
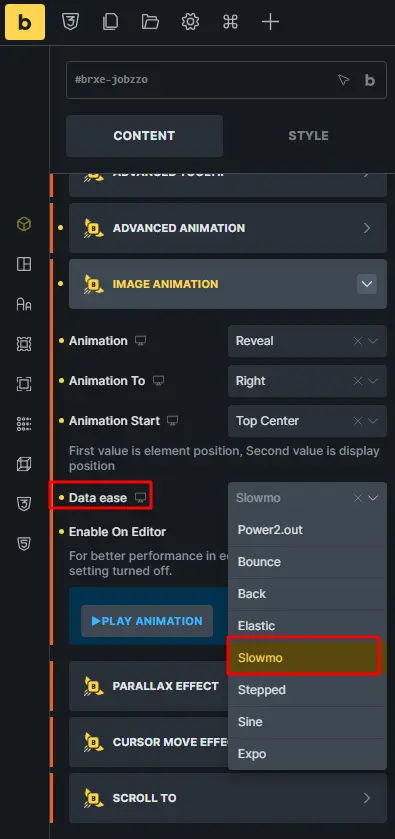
- Power2.out: starts fast and slows down
- Bounce: ends with a bouncing motion
- Back: slightly overshoots and settles back
- Elastic: stretches and snaps back with force
- Slowmo: slows in the middle
- Stepped: moves in distinct steps
- Sine: smooth like a wave
- Expo: starts fast and ends sharply
We use Slowmo data ease for the image animation.. For professional, understated work, Power2.out and Sine are safe choices; Bounce and Elastic are more playful.
Step 5: Play the Animation on Enable on Editor
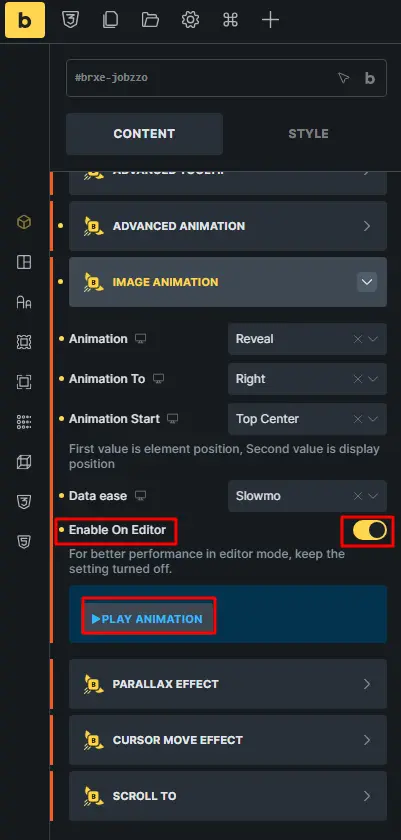
Enable On Editor lets you preview the animation inside the Bricks editor. Set it to Yes and the animation plays in the editor just as it does on the live page. If you leave it off, the element stays static in the editor, but this does not disable or remove the animation on the live site. For better editor performance, you can keep this setting turned off while building.
In the Play Animation section, click Play Now to see how the image animation looks right away, useful for checking the effect without leaving the editor.
Step 6: Final Output of Reveal Animation
Examples and Use Cases
Here’s how the three image animation effects work on real Bricks pages.
A portfolio gallery – Apply Reveal to each project image, alternating the direction (left for one column, right for another) so work slides into view as visitors scroll. This makes a portfolio feel considered and premium rather than like a static grid.
A hero or feature image – Use Scale with a start value below 1 so the image grows gently into place as the visitor scrolls, adding depth to the top of a page or a key feature section.
A standout visual – Use Stretch on a single large image, set up with the 40% width and 100vh height, to create a distinctive, eye-catching moment on a landing or about page.
An agency services page – Apply Reveal with a subtle easing like Power2.out to supporting images throughout the page, giving the whole layout visual rhythm without distracting from the copy.
Reveal is the everyday workhorse for galleries and content images, Scale adds depth to key visuals, and Stretch is a selective, standout effect.
Common Mistakes to Avoid
Image animation is easy to apply, which makes a few mistakes common.
Animating every image – Motion on every image gets noisy and slows the page. Reserve animation for images that benefit from it.
Starting the animation too late – If the start point fires after the image is already fully visible, visitors miss the effect. Choose a start position that plays as the image comes into view.
Overusing dramatic easing – Bounce and Elastic are fun but can feel unprofessional on business sites. Power2.out and Sine are safer for premium work.
Extreme scale values – A large gap between Start Scale and End Scale can feel jarring. Keep the change moderate.
Skipping the Stretch setup – Stretch needs a slightly larger image and the Layout width and height set correctly (40% and 100vh) to work properly.
Forgetting mobile and unoptimized images – Test on mobile, and optimize image files, animation draws attention to images, so heavy files hurt both speed and impression.
How BricksFly Helps
Image Animation is one of BricksFly’s Pro GSAP extensions, part of a complete Bricks Builder toolkit that also includes 30+ full website templates, 500+ ready-made sections, extra Elements, and other no-code animation features. So image animation isn’t a standalone plugin here, it’s integrated with the tools you use to build the whole site.
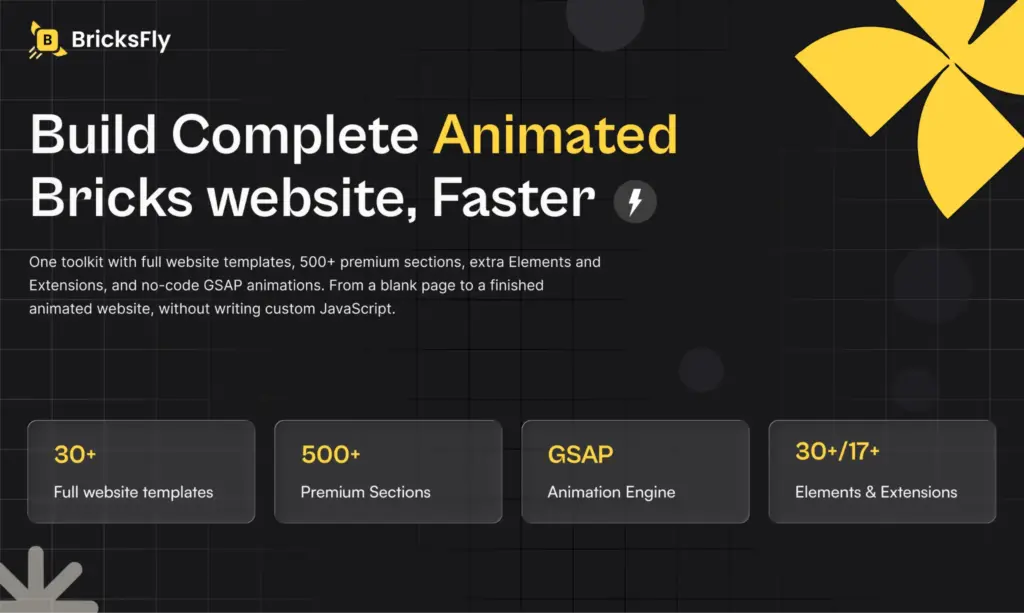
- Visual GSAP animations: Create advanced motion effects directly inside Bricks Builder.
- No custom JavaScript required: Configure animations visually instead of writing animation code manually.
- 30+ website templates: Start complete website projects with pre-designed layouts.
- 500+ ready-made sections: Quickly build landing pages, service pages, pricing sections, testimonials, CTAs, and more.
- Additional Elements and Extensions: Expand Bricks Builder with extra design and functionality options.
- Advanced scroll effects: Includes ScrollTrigger, SplitText, parallax, horizontal scroll, pin effects, and smooth scrolling.
- Built for Bricks Builder: Everything works within the Bricks workflow, reducing the need to move between separate tools.
Final Thoughts
Creating image animations in Bricks Builder does not have to mean writing custom JavaScript or building complex GSAP timelines from scratch. With BricksFly, you can add polished motion directly inside your Bricks workflow and control how images appear, move, and respond as visitors scroll through the page.
A subtle reveal, parallax effect, or scroll-based transition can make an image feel more engaging without distracting from the content. Start with simple effects, keep timing consistent, and always test on different screen sizes. With the right balance, BricksFly helps turn static visuals into more dynamic, memorable website experiences.
FAQs
Activate the Image Animation extension in BricksFly (Dashboard, BricksFly, Extensions, then toggle Image Animation under GSAP Extensions and Scroll Smoother). Then edit a page in Bricks, select an image element, and open Image Animation. Choose Reveal, Scale, or Stretch, set the direction, start position, and easing, and the image animates with no code.
BricksFly’s Image Animation includes four options: None (no animation), Reveal (slides the image in from the left, right, top, or bottom), Scale (smoothly adjusts image size as users scroll), and Stretch (adds a dynamic stretching movement). Each is configured visually with settings for direction, scroll start position, and easing.
No. With BricksFly’s Image Animation extension, you add GSAP-powered scroll effects through visual controls. You select the image element, choose an effect, and adjust settings like direction, animation start position, and easing. The tool generates the underlying GSAP animation, so designers can create professional image motion without JavaScript.
Use the Animation Start setting to control this. Options range from Top Top through Bottom Bottom, plus Custom for your own scroll values. Choose a start point that fires as the image comes into view (such as Top Bottom or Top Center) so visitors actually see the effect rather than scrolling past it after it has already played.
Enable On Editor lets you preview the animation inside the Bricks editor. Set to Yes, the animation plays in the editor just as it does on the live page. If it’s off, the element stays static in the editor, but the animation still works on the live site. Keeping it off while building can improve editor performance.
Image Animation is a Pro GSAP extension in BricksFly, so it requires BricksFly Pro along with the Bricks theme. Once Pro is installed, you activate Image Animation in the Extensions tab (under GSAP Extensions and Scroll Smoother) and can then apply Reveal, Scale, or Stretch to any image element in the Bricks editor.





Leave a Reply
You must be logged in to post a comment.